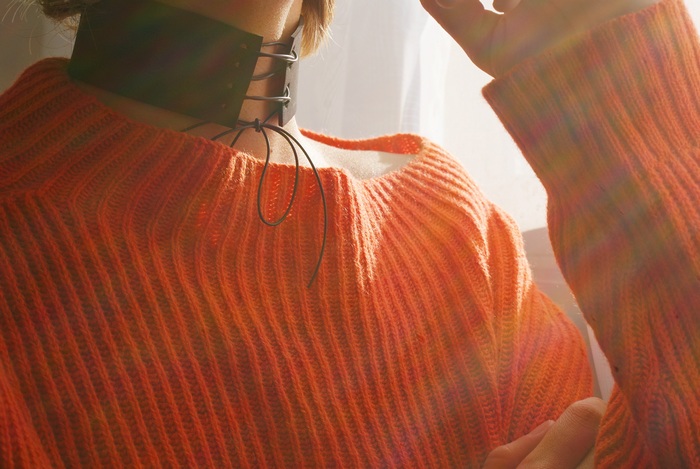
Chokers... something that I could make (and wear!) in every variation. And this is exactly what I do, as you can see here, here and here (yeah, I'm a bit obsessed). No way, they are SO easy to make and, honestly, give always that cool touch you want for your outfit. I've been seeing these lace up chokers around lately, but the most of them has a clasp on the back. I opted for the easiest version, so that everyone (really) can make it. Cause less time it takes the better it is, isn't it? // Collarini... qualcosa che adoro creare (ed indossare!) in ogni variante. Ed infatti è quello che faccio, come vedete qui, qui e qui (già, sono giusto un po' fissata). Non ce n'è, sono facilissimi da fare e, onestamente, danno sempre un tocco cool all'intero outfit. Ultimamente vedo questi choker con lacci un po' ovunque, ma la maggior parte di loro ha una chiusura. Io ho optato per la versione più semplice, così che tutte (davvero) possano realizzarne uno. Perché meno tempo ti prende, meglio è, no?

You will need almost no money and time to make this choker.
Yes, what makes a perfect DIY!
//
Costo quasi zero e pochissimo tempo per realizzare questo collarino.
Già, ciò che rende un fai da te perfetto!
***
You need // Vi occorre:
- A piece of neoprene. // Un pezzo di neoprene.
- String. // Laccetto.
- Multihole punch. // Pinza fustellatrice.
- Scissors, ruler and pencil. // Forbici, righello e matita.

How to // Come procedere:
1)
Cut a band of neoprene, 4 cm (1,5 in) high and as long as your neck circumference,
but leaving about 4 cm. // Tagliate una fascia di neoprene, alta 4 cm e lunga
quanto la circonferenza del vostro collo, meno 4 cm circa.

2)
With ruler and pencil sign on one extremity 4 points, leaving 0,8 cm (0,3 in) from the top
and leaving 0,8 cm between all them. // Con il righello e la matita, segnate 4 punti
su una estremità, lasciando 0,8 cm dall'alto e tra ogni punto.


3)
Pinch the two extremities together and make 4 holes, so that you punch both
the sides at the same time (and so that they will be identical). // Sovrapponete
le due estremità e fate 4 buchi, così da forare entrambi i lati contemporaneamente
(e da avere dei buchi identici).


4)
Take your string and insert it crossing into the holes. This point is just to make you
see how to do, you will repeat the passage wrapping the band around your neck
and inserting the string, ending with a know. Be careful to not tighthen too much! //
Prendete il cordino ed inseritelo incrociandolo all'interno dei buchi. Questo punto è solo
per farvi vedere come fare, ripeterete questo passaggio con la fascia intorno al collo,
inserendo il cordino e fnendo con un nodo. Mi raccomando, non stringete troppo!


5)
Et voilà!


After making this choker I was thinking about how to match it
and I found some cool outfit ideas on FashionMia.
There are a lot of beautiful women's dresses and also sexy plus size clothing,
so that everyone can find the perfect one!
They're cute but cheap that is always winning if you don't want to spend a fortune!
On FashionMia you can also find every kind of clothing, from tops to skirts,
pants, coats and much more, always with affordable prices (I am
dreaming about a Christmas sweater!).
Check their webiste and find your favourite one.
Here my personal choices:
//
Dopo aver fatto questo collarino ho pensato a come abbinarlo
e ho trovato un sacco di idee su FashionMia.
Ci sono tanti bei vestiti da donna, anche taglie comode, così che ognuna
possa trovare quello adatto a sè!
Sono ben fatti ma a buon prezzo, il che è fantastico, se non si vuole spendere una fortuna!
Su FashionMia troverete ogni genere di capo d'abbigliamento, dai top,
alle gonne, ai pantaloni, cappotti e molto altro ancora, sempre con prezzi
abbordabili (io sto desiderando un maglione natalizio!).
Andate a vedere il loro sito per scoprire di più.
Qui quelli che ho scelto io:
This black and white dress // Questo abito nero e bianco
(link)

or this super classy beauty // o questa bellezza super elegante
(link)

or this sexy red dress // o questo sexy abito rosso
(link)

and ending with a beautiful velvet one! // E chiudendo con uno in velluto!
(link)

That's all, for today! Let me know if you liked the tutorial and happy
new week!
//
Per oggi è tutto! Fatemi sapere se vi è piaciuto il tutorial
e buona nuova settimana!
xx
This post is in collaboration with fashionmia.com.
Questo post è in collaborazione con fashionmia.com,ma non sono stata pagata o ricompensata in alcun modo per parlare bene dei prodotti.
L'articolo rispecchia in modo trasparente la mia opinione.
I am so in love.. you did an amazing job! I am so happy I found your blog, keep up the amazing work! x
ReplyDeleteadelelydia.blogpost.com
Thank you so much! Come visit again! xx
DeleteLove this DIY! So easy to do and it looks so cool and trendy. Not to mention different from the rest of the chokers. :) Thanks for sharing!
ReplyDeletexx
www.stylebydeb.com
Thank you for your kind words!
Deletenice! thanks for the detailed how-to!
ReplyDeleteThank you! xx
DeleteThis is really good and it suits you so much :)
ReplyDeleteRosy | Sparkles of Light Blog
Thank you, Rosy!
Deletepretty good work! www.luck-happens.blogspot.com
ReplyDeleteThank you!!!
DeleteThis is so cool!!!! And easy to make too!!! Great job :)
ReplyDeleteYiota
PinkDaisyLoves
Yes, SO easy! :D
DeleteAnother great DIY from you Elisa. I love it! The dresses you selected are really pretty too. Have a great week ahead :)
ReplyDeletexo
Sauniya | Find Your Bliss ♡
Thank you always, Sauniya, for your lovely words. Happy Monday!
DeleteLove the choker; looks really cool!!!
ReplyDeleteANOUK
Thank you, babe!
DeleteThis looks really amazing! Great work!
ReplyDeletexx
Thank you, Lara :)
Deleteso fabe babe i really love the one on the cover!
ReplyDeletehttp://highheelpoodl.blogspot.rs/2016/11/blue-shirt-with-stripes-sammydress-bag.html
Thank you, honey! xx
DeleteThis choker is your best yet. It looks so chic and high end too!
ReplyDeleteSxx
www.daringcoco.com
COMME des GARCONS GIVEAWAY
Sooo glad to read that, thank you!
DeleteOoh I love this! Can't get enough of chokers at the moment xx
ReplyDeletemoorizZLA
I like chokers a lot, and the DIY version is so nice and customizable.
ReplyDeleteLinda, Libra, Loca: Beauty, Baby and Backpacking
Hello my dear Francine,
ReplyDeleteanother very cool DIY! At the moment I love chokers and this is such a cool idea! Thanks for sharing and have a wonderful week.
xx from Bavaria/Germany, Rena
www.dressedwithsoul.com
oh wow this looks amazing! <3 thanks for sharing this tutorial
ReplyDeletehttp://www.pinkoolaid.com/
Love this! I definitely want to make one and try to rock the choker trend in a little more "upscale" way than those plastic ones from our past ;)
ReplyDelete-Clarissa @ The View From Here
Such a great choker!
ReplyDeleteXx
Molly
www.trendychickadee.com