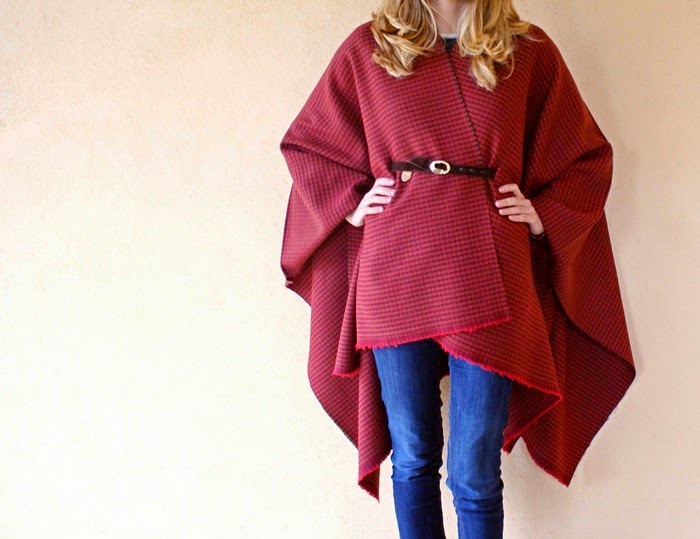
The easiest way to make a beautiful wool cape without sewing machine! For your cozy and cold days, never forgetting about fashion. // Il modo più facile per realizzare un bellissimo capo in lana senza macchina da cucire! Per i vostri giorni freddi e in comodi, ma senza rinunciare a un tocco fashion.
I really can't wait for that moment when I'll leave my quilted coat in my closet
in exchange for prettier coats and capes. So, to not be unprepared when days will be
a bit warmer, I made this SUPER easy wool overcoat cape in about... hmm, 5 minutes?
I found this beautiful wool in sale and I didn't think twice!
//
Non vedo davvero l'ora di abbandonare il piumino nell'armadio ed indossare
cappotti e capi più belli. Dunque, per non arrivare impreparata a quei giorni in cui
farà un po' più caldo, ho deciso di realizzare questo SUPER semplice capo in lana in circa...
mmm, 5 minuti?
Ho trovato questa lana in saldo e non ci ho pensato due volte!
***
You need // Vi occorre:
- Squared piece of wool fabric. For the side measure: raise your arms perpendicular
to the floor and ask someone to measure from wrist to wrist. // Uno scampolo quadrato
di lana. Per la misura del lato: alzate le braccia perpendicolarmente al pavimento
e chiedete a qualcuno di misurare da polso a polso.
- Scissors // Forbici.
- Chalk. // Gessetto.
- High waisted belt. You can also use a thin scarf or everything you can wrap around
your waist. // Cintura a vita alta. Potete usare anche una sciarpa sottile, o qualsiasi cosa
riusciate ad arrotolarvi intorno alla vita.
2)
Fold your wool in half, then again in half. // Piegate la lana a metà, poi
di nuovo a metà.
3)
Cut just between the first and the second folds, as you see in the next picture.
I stopped cutting about 10 cm before fold's end, to have front side shorter than back,
but you can cut until fold's end to have equal length. // Tagliate solo tra la prima e
la seconda piega. Io mi sono fermata a circa 10 cm dalla fine, per avere il retro
più lungo, voi potete tagliare fino alla fine della piega,
se volete la stessa lunghezza davanti e dietro.
4)
The cut creates the front side. // Il taglio è per la parte anteriore.
5)
Now the holes for belt. Open your fabric on your table and measure
about 20 cm for each side starting from the cut you did (for the width) and wear the cape
to find the right height of your waist. Sign the points with the chalk where you'll do the holes. //
Ora i buchi per la cintura. Aprite il tessuto sul tavolo da lavoro e misurate circa 20 cm
per ogni lato, a partire dal taglio che avete fatto (per la larghezza) ed indossate
il capo per avere la giusta altezza della vostra vita.
Segnate dunque i punti col gessetto per indicare dove farete i buchi.
6)
Pinch the fabric and cut it where you signed belt loops. Cut about 3 millimeters more
than your belt's height. To wear this cape, insert the belt in one hole, make it pass
around your waist (but under the fabric), then send it out from the other hole. // Prendete il
tessuto tra le dita e tagliatelo in prossimità dei segni che avete fatto. Tagliate circa
3 millimetri in più rispetto all'altezza della vostra cintura. Per indossare
questo capo, infilate la cintura in un buco, fatela passare intorno alla vostra vita
(ma sotto il tessuto), poi fatela uscire dall'altro buco.
7)
Done! // Fatto!
I wish you a great weekend! // Vi auguro un bellissimo weekend!
xx


che bello, sei davvero bravissima!!
ReplyDeleteThank you!
DeleteSO BEAUTIFUL BLANKET CAPE
ReplyDeleteThank you Linda :) :)
DeleteSuch a good idea! I love it with the tiny belt too.
ReplyDeleteThank you Kristiina! :) I am happy you like it!
ReplyDeleteVery creative stuff!
ReplyDeleteThank you!!! xx
Delete