")
If you follow me on Pinterest, you see that I have a "little" obsession with bohemian
things and also my jewels have that gypsy touch I love sooo much.
I saw everywhere on web those cute macrame wall decorations and, even if I knew NOTHING
about macrame, I decided to do my own hanging thing, trying to give it a personal style.
So, nothing better than Easter holidays to spend a morning doing this beautiful
Spring - Summer boho object. It took me about one hour (I told you, I was
a beginner), but I found it so easy and really relaxing to do.
I will try to show you how to make yours, trust me when I say that it is waaay easier
than it seems!
//
Se mi seguite su Pinterest potete notare la mia "piccola" ossessione per le cose bohémien
ed anche i miei bijoux hanno quel tocco gypsy che amo tanto.
Ho visto un po' ovunque nel web quelle bellissime decorazioni macramè e, anche se
non sapevo nulla riguardo il macramè, ho deciso di farne una tutta mia, cercando di darle
uno stile personale.
Così, niente di meglio che le vacanze di Pasqua, per prendermi una mattina per realizzare questo
oggetto boho molto primaverile/estivo. Ci ho messo circa un'ora (ve l'ho detto, ero
principiante), ma è stato semplice e persino rilassante.
Cercherò di mostrarvi come realizzare il vostro, credetemi quando vi dico che è mooolto
più facile di quanto non sembri!
***
You need // Vi occorre:
1) A branch. // Un ramo.
2) Cotton thread. // Filo di cotone.
3) Scissors. // Forbici.
4) Beads. // Perline.

How to // Come procedere:
1)
Cut 12 strings of about 1 meter (39 in) of cotton thread and fold them in half. I tell you that
I started with 10 strings, but I understood later that the twist wasn't symmetrical (to have the
pyramid shape you have to use an even number of strings which, didived by 2, gives an even
pyramid shape you have to use an even number of strings which, didived by 2, gives an even
number too). I had almost finished, so I didn't do everything again, just undid some knots
and added the 11th and12th strings (you will understand later). // Tagliate dodici strisce di filo
di circa 1 metro ciascuna e piegatele a metà. Vi dico subito che io sono partita con 10,
ma mi sono resa conto dopo che l'intreccio non era simmetrico (per avere la forma a piramide
dovete usare un numero pari di strisce che, diviso per 2, dia ancora un numero pari).
Io avevo quasi finito, così non ho rifatto tutto dall'inizio, ma ho disfatto qualche nodo
ed aggiunto l'undicesima e dodicesima stringa (capirete bene più avanti).

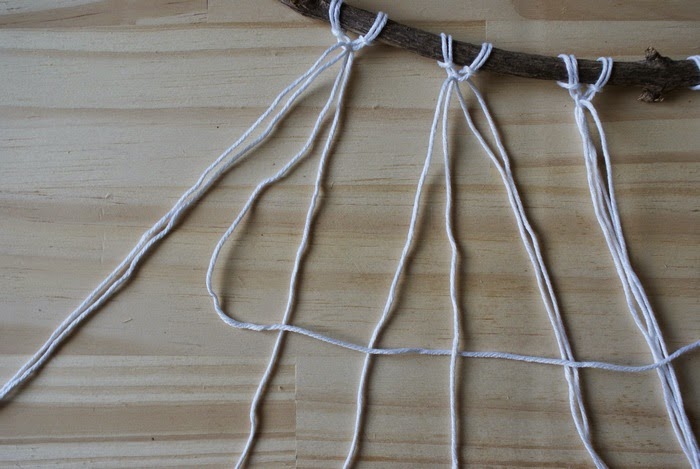
2)
Knot each string to the branch as you see below (to make it easy: as you knotted pendants to
your phones). // Annodate ogni singola striscia nel modo che vedete sotto (per farla semplice:
nello stesso modo in cui annodavate i ciondoli ai telefonini).


3)
You will obtain this... (I added the unlucky 2 strings with paint haha!) // Otterrete questo...
(Io ho aggiunto le due sfortunate strisce con paint ahah!)

4)
Start from the left (first and second strings) and divide the four sub-strings. We will call them
1A, 1B, 2A and 2B. // Partite da sinistra (prima e seconda stringa) e dividete le 4 sotto-stringhe.
1A, 1B, 2A and 2B. // Partite da sinistra (prima e seconda stringa) e dividete le 4 sotto-stringhe.
Le chiameremo 1A, 1B, 2A e 2B.

5)
Now the knot: if you understand this, you have done the 90% of the work. Take 1A and
make it pass ON 2A and 1B but UNDER 2B. // Ora il nodo: se capite questo avete fatto
il 90% del lavoro. Prendete 1A e fatela passare SOPRA 2A e 1B, ma SOTTO 2B.

6)
Now take 2B and make it pass UNDER 1B and 2A but ON 1A. // Ora prendete 2B e fatela
passare SOTTO 1B e 2A, ma SOPRA 1A.

7)
Pull delicately all the sub-strings to make the knot, you will obtain this... // Tirate
delicatamente tutte le sotto-stringhe per fare il nodo, otterrete questo...

8)
Do it again, always following the scheme above. // Ripetete tutto, sempre seguendo
lo schema precedente.


9)
Here the finished knot... // Ecco il nodo finito...

10)
Repeat from 6 to 9 points with couples of strings: 3 and 4, 5 and 6, 7 and 8, 9 and 10,
11 and 12. It will be 3A, 3B, 4A, 4B etc... You will obtain 6 groups of sub-strings. //
Ripetete dal punto 6 al 9 con le coppie di stringhe: 3 e 4, 5 e 6, 7 e 8, 9 e 10, 11 e 12.
Sarà 3A, 3B, 4A, 4B ecc... Otterrete 6 gruppi di sotto-stringhe.
11 and 12. It will be 3A, 3B, 4A, 4B etc... You will obtain 6 groups of sub-strings. //
Ripetete dal punto 6 al 9 con le coppie di stringhe: 3 e 4, 5 e 6, 7 e 8, 9 e 10, 11 e 12.
Sarà 3A, 3B, 4A, 4B ecc... Otterrete 6 gruppi di sotto-stringhe.

11)
Now take the 3rd and 4th substrings of group1 and the 1st and 2nd of group2 and start doing
the knots in the same way. // Ora prendete la terza e quarta sotto-stringa del gruppo 1
e la prima e seconda del gruppo 2 e ricominciate con i nodi, sempre allo stesso modo.


12)
Again with 3d and 4th or group2 and 1st and 2nd of group3 and so on. // Di nuovo,
con terza e quarta del gruppo2 e prima e seconda del gruppo3 e così via.


13)
Repeat always starting from 3rd and 4th of group1 and 1st and 2nd of group2 and so on, until you
will obtain the pyramid shape. // Ripetete sempre partendo dalla terza e quarta del gruppo1 e
prima e seconda del gruppo2 e via così, finchè non otterrete la forma a piramide.


14)
You have almost done! Now add the beads and fix them with simple knots. // Ci siete
quasi! Ora aggiungete le perline e fissatele con semplici nodi.


15)
Cut the extremities of the strings to obtain symmetrical lengths. I made knots at the ends. //
Tagliate le estremità delle stringhe per ottenere lunghezze simmetriche. Io ho fatto
anche dei nodini alla fine.

16)
Add a piece of thread to hang your decoration. // Aggiungete un pezzo di filo per appendere
la decorazione.

17)
Voilà!
")
")
")
It has been a bit long, but isn't it sooo beautiful? I simply love it! // Lo so che
è stato un po' lungo da fare, ma non è bellissimo? Io lo adoro!
xx
Wow! I've been eying a few of these creations on etsy for a while now, I never thought about a possible DIY though! Genius!
ReplyDeleteSxx
www.daringcoco.com
Thank you! Haha I understand well, I was dreaming about one of these but I definitely opted for doing by myself and it came out so pretty! You should try, it will be more satisfying than buying! xx
DeleteLove it! Your DIYs are always amazing <3 I've been redecorating my room and this is perfect timing!
ReplyDeleteThank you, kisses from Hungary xo
Csenge | Csenge's Point
You are so kind, as always! Let me know when you make yours! I am curious to see it :D :D
DeleteThis diy is totally beautiful. I love it and wish I had your skills.
ReplyDeletexx
Thank you, dear! Oh, you have great style and I am sure you are as skilled as me ;)
DeleteWhat graceful Elisa. So simple to do and is so beautiful!
ReplyDeletehttp://dibobis.blogspot.com.br
Thank you! Yes! So easy! I was so proud of me, I couldn't believe how simple it was :D
DeleteThat is soo beautiful! I've never seen anything like it before! I'll definitely try this out!
ReplyDeletexx Bash | Bash Says Hey | bloglovin'
Thank you! Oh, yes, you definitely should try it! :)
DeleteI love this, it looks lovely! What an awesome DIY :)
ReplyDeletemunchies&musings
Thank you so much! <3
ReplyDeleteIts realy good DIY i love it!
ReplyDeleteThank you soo much :)
Delete<3333 great post!
ReplyDeletelove it
Karolina Gerspucci
Thank you Karolina!
DeleteGreat post
ReplyDeleteWould you like to follow each other ? I'll follow back after it
Www.miharujulie.com
Thank you :) :)
DeleteOh my god, what a beautiful DIY. That's amazing
ReplyDeleteBig kisses
http://bellamorous.blogspot.com.es/
Thank you so much, Lidia! xx
Deletewow, che bello!
ReplyDeletePassa a trovarmi VeryFP
Grazie Veronica, passerò presto ;) xx
Deletelove this! I need it in my life xx
ReplyDeletewww.emilyjanewebb.co.uk
Haha I understand, this is why I did mine :D
DeleteThis is so lovely! Great DIY
ReplyDeleteGina x
Thanks Georgina! <3
Deletethis looks so cute, thanks for sharing!
ReplyDeletedanielle | avec danielle
Thank you too Danielle for your comment!
Deletelove this DIY :)
ReplyDeletekisses from dubai ♥
www.mahryska.com
Thank you dear Mariyah!
DeleteOMG, this look so beautiful. I totally want to make this :) Looks great…well done!
ReplyDelete<3 <3 Mahshid مهشید
http://www.thankstofashion.com
Let me know if you do it! Thank you for your comment! xx
DeleteLove this, it looks great! x
ReplyDeletewww.stylepetal.blogspot.co.uk
Thank you sweetie!
DeleteI love this DIY! I've been thinking about doing a string one for my son's room.
ReplyDeleteSam
www.thehipkidblog.com
Thank you Samantha! I am sure it will be great! xx
DeleteGreat DIY, it's looks so pretty !
ReplyDeletexoxo,
atwednesdaysiwearpink.blogspot.com
Thank you, Carina! xx
DeleteLove this! The combination of branch and fringe look is perfect
ReplyDeleteThank you Lisa, so nice to read this from you!
DeleteThanks for sharing this!! :)
ReplyDeleteIt definitely was a great read and I feel the need to try this out :)
#verycreative
xx,
Regine
www.ginnywhowanders.blogspot.com
Oh, thank you so much! I am glad you enjoyed the reading (to me it is as important as the diy itself :D ). Let me know if you do yours! xx
Delete